Tag: crafts
Tips for Trying Tie Dye at Home
Tie dye has come back in a BIG way in 2020! If you’ve looked online or shopped at stores recently you’ve probably seen lots of tie dye merchandise to buy. Instead of buying it pre-made, why not get crafty and create your own tie-dye at home? Read below for some tips for creating awesome and unique tie dyed garments!
1 – Think about what you want to tie dye. Is it a t shirt or a pair of shorts? Either way make sure that the material is cotton so the dye will adhere to the fibers of your garment as best as possible. Also, choose a white garment so your colors will stand out.
2 – Purchase your fabric dyes individually or purchase a kit. Stores like Michaels, Target and Amazon are selling kits that come with everything you need. If you don’t use a kit, you’ll also need some squeeze bottles, plastic sheets, plastic wrap, plastic gloves and rubber bands.
3 – Bullseye? Sunburst? Polka Dots? Decide which tie dye pattern you want to try. Click here for a great list of patterns with detailed instructions on how to achieve each look. Fold or roll your garment and place your rubber bands accordingly.
4 – Set up your work station outdoors to limit the mess. Lay out your plastic sheet and get your fabric dyes in the squeeze bottles. Make sure to wear your plastic gloves so you don’t tie dye your hands! (if you do get dye on your hands you can mix baking soda and water together to create a paste. Scrub it on your skin and wash away with soap and water.)
5 – Have fun and unleash your creativity! Choose fun color patterns and don’t be afraid to be bold. You won’t know how the garments will look until they’ve dried and been washed.
6 – When your garments are done wrap them in plastic wrap and let them dry overnight. When they’re ready to be unwrapped, wash them outdoors with a hose or in a laundry sink to remove the excess dye. After you’ve washed them throw them into the washing machine (without any other clothes) for a quick rinse and then dry.
7 – Enjoy your new tie dyed creations! Make sure to wash them separately for the first few washes to be sure the dye doesn’t bleed onto other clothes.
5 DIY Valentine’s Day Decorating Ideas
Love is in the air!
Are you hosting a Valentine’s Day party or dinner at your place this weekend? You don’t need to break the bank to decorate with rose petals. Check out these fun and easy DIY projects that will make your home look decked out for Valentine’s Day!
1 – Pucker Up Balloons – All you need is red lipstick and some white balloons for this one!

2 – Candy Heart Garland – Grab some construction paper and some baking twine to create this garland the kids are sure to love!

3 – Candy Heart Bouquet – The vase of water is hidden underneath a pile of conversation hearts in this cute Valentine’s centerpiece!

4 – Heart Branch Tree – Some twigs from the yard, twine, paper and a little spray paint and you can create this adorable heart branch tree for your Valentine’s party.

5 – Heart Balloon Backdrop – If you’re an Instagram lover, this balloon heart will make the perfect background for your Valentine photos!

DIY White-Washed Pumpkins
Get ready for fall with these DIY shabby chic pumpkins! Watch the video below to learn a simple craft with 5 steps.
DIY Tomato Cage Planter
Bring spring and style into your home with this fun (and totally easy) DIY project!
[youtube https://www.youtube.com/watch?v=BX6xvwyr2mw?rel=0&w=560&h=315]
DIY Football Mason Jar Mugs
It’s almost Super Bowl Sunday! If you’re hosting a party this weekend serve your drinks in these fun, festive mugs!
[youtube https://www.youtube.com/watch?v=-V4aLVYw_gM?rel=0&w=560&h=315]
DIY Make Pretend Snow
Stay warm inside this winter and let your kids play with make pretend snow! A fun DIY for the kids and only two ingredients needed. Watch the video below to learn more!
[youtube https://www.youtube.com/watch?v=5YwSm4rhnIo?rel=0&w=560&h=315]
5 Tips for Wrapping Holiday Gifts
It’s time to pull out the scissors, tape and ribbon and start wrapping those holiday gifts! If you’re feeling overwhelmed or uninspired, read these tips before you start cutting that wrapping paper!
1.If you prefer using gift bags over wrapping with paper, make sure you have enough. Count the items you have and measure their sizes before heading to the store to purchase your bags. Don’t forget the tissue paper!

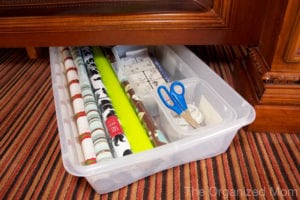
2. Now is a good time to create a gift wrapping storage solution if you haven’t already. Plastic bins or even garment bags make for great storage. Put your paper, scissors, tape, tags, ribbon and a pen in the bin or bag so you know where everything is.

3. Rather than buy a bunch of different wrapping paper patterns, try using brown craft paper to wrap your gifts. Add color and patterns by choosing different colored ribbons to your brown packages.

4. Try adding some unique additions to your packages like bells or greens. Tie them onto your ribbon for a fancy and impressive touch on your packages.

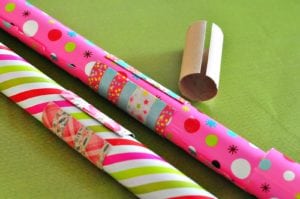
5. If you purchased wrapping paper on rolls, put empty toilet paper or paper towel roll around your roll to avoid paper rolling open and getting ripped.

DIY Cranberry and Cedar Centerpieces
Make your table festive and beautiful with this easy #princetonsDIYproject!
[youtube https://www.youtube.com/watch?v=OMBOyk2rDGw?rel=0&w=560&h=315]
DIY Wednesdays Cinnamon-Scented Pine Cones
Watch the short video below to learn how to make your own cinnamon-scented pine cones for your fall decor!
[youtube https://www.youtube.com/watch?v=YrYzcnGa89M&w=560&h=315]
DIY St. Patty’s Day Rainbow Treat Bags
Perfect for the kids, teachers or neighbors, these DIY treat bags are a fun way to celebrate St. Patrick’s Day!
[youtube https://www.youtube.com/watch?v=_mE7Z4hrr1s&w=560&h=315]
